When it comes to reliable hardware, few brands are as respected as Apple. Its lineup of iPhones, iPads, and MacBook’s are among the best on the market, and they’re known to run for years without encountering any serious issues. However, not even Apple is perfect – and every so often, you’ll need to reset your device to get rid of a glitch.
Apple made it easy to reset all its devices, but resetting your iPad is arguably the easiest. It only takes a few minutes to perform the operation, and even the most basic smartphone user should have no problem carrying out the task without any help from a professional.
There are three types of resets to be familiar with: soft reset, factory reset, and force restart. These each do different things to your iPad, and it’s important to know the difference before getting started. The last thing you want to do is factory reset your device (and wipe its settings) when all you really needed was a soft reset.
Here’s a look at how to reset an iPad and get it working like new.

Jesse Hollington / Digital Trends
How to restart your iPad
If you find that your iPad is running more slowly than usual — perhaps it’s stuttering or lagging a little, or you’re having trouble loading a specific app or game, but it’s still responsive to your touches — then you should try restarting it. This is sometimes called a “soft reset,” but it’s actually just like rebooting your Mac or Windows PC; a soft restart is simply turning your iPad off and on again, and it can fix a multitude of issues as it flushes out the apps that are running in memory.
You won’t lose any data or settings, and nothing will be deleted from your iPad when you do a soft restart, so it’s the first thing you should try when you have an issue with your Apple tablet. Here’s how to soft restart an iPad:
Step 1: If you have an iPad with Face ID or Touch ID integrated in the top button, press and hold the top button with either volume button until the power off slider appears on the screen. If you have an iPad with the Home button, just press and hold the top button until the slider appears.
Step 2: Drag the power off slider from left to right to turn your iPad off.
Step 3: Once the iPad is completely off, wait about 30 seconds and then press and hold the top button again until you see the Apple logo appear on the screen.
Step 4: Once the iPad lock screen appears, press the home button (if equipped) or slide up from the bottom of the screen and enter your passcode to unlock it. For security reasons, you can’t use Face ID or Touch ID after restarting your iPad until you’ve unlocked it at least once using your passcode.

Apple
How to force restart your iPad
If your iPad screen freezes up, or you find that it’s not responding to taps in the usual way, then you may not be able to perform a normal restart. In this case, it’s time to try a forced restart instead. This is just an alternative method of turning your iPad off and on again. Like the soft restart, this won’t delete anything, and no data will be lost. It’s the first thing to try if your iPad is unresponsive.
How to restart an iPad with Face ID
If you have an iPad equipped with Face ID, such as the 2022 iPad Pro, you need to do the following:
- Press and quickly release the volume up button (the one closest to the top button).
- Press and quickly release the volume down button (the one farthest from the top button).
- Press and hold the top button until the device begins to restart.
How to restart an iPad with a Touch ID sensor in the top button
If you have one of Apple’s recent iPad models with an edge-to-edge display and a Touch ID sensor in the top button, such as the 2022 iPad or 2021 iPad mini, the steps to force restart your iPad are the same as for the Face ID-equipped iPad Pro:
- Press and quickly release the volume up button (the one closest to the top button).
- Press and quickly release the volume down button (the one farthest from the top button).
- Press and hold the top button until the device begins to restart.
How to restart an iPad with a home button
If your iPad has a home button on the front, such as the 2021 iPad, you can force a restart by pressing both the front home button and top button at the same time until you see the Apple logo appear. This method works both for iPads with Touch ID and older non-Touch ID models.
Jesse Hollington / Digital Trends
How to backup iPad using iCloud
If your iPad is really causing you problems, sometimes a factory reset can help to clear things up. We’ll talk about how to do that shortly, but since a factory reset erases everything on your iPad, you’ll want to make sure you’ve backed up all of your important data first.
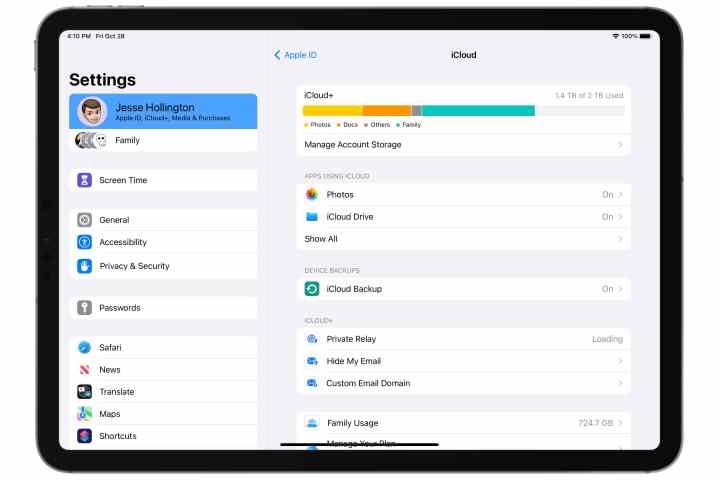
If you’re paying for iCloud storage, the easiest way to do this is to back up your iPad to iCloud over a Wi-Fi network. In fact, your iPad may already be doing this; depending on which options you chose when you set it up, iCloud Backup will run automatically every 24 hours as long as your iPad is plugged in and connected to Wi-Fi.
Step 1: Open the Settings app on your iPad.
Step 2: Select your name in the top-left corner.
Step 3: Select iCloud.
Step 4: Select iCloud Backup.
Step 5: Ensure the switch beside “Back Up This iPad” is toggled on.
When iCloud Backup is enabled, your iPad automatically backs up to iCloud when it’s charging and on a Wi-Fi network, and it’s been more than 24 hours since the last iCloud backup. You should see the last time a successful backup was made below the Back Up Now button.
Step 6: Select Back Up Now to perform a manual backup of your iPad.
This may take anywhere from a few minutes to an hour or more depending on the speed of your internet connection and how recently your last backup was made.
Jesse Hollington / Digital Trends
How to backup your iPad to your Windows PC or Mac
If you don’t subscribe to an iCloud storage plan, it’s unlikely you’ll be able to use iCloud Backups. Apple only offers a paltry 5GB of free storage, which typically won’t be enough to back up even the smallest iPad.
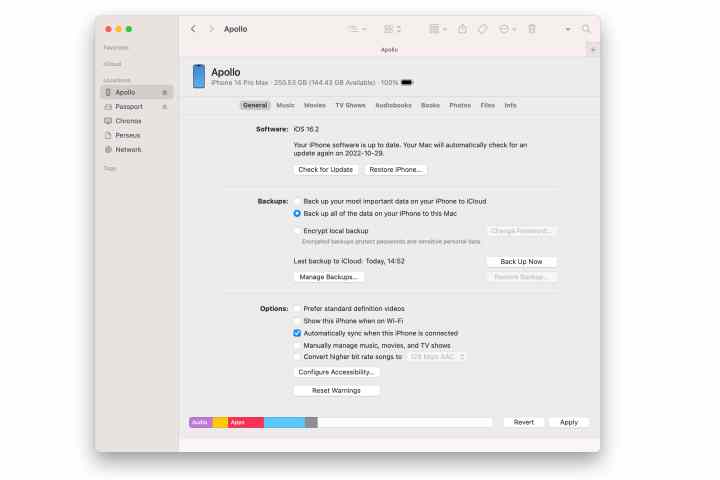
Fortunately, you can still back up your iPad to your computer over a USB connection. If you’re using a Windows PC or a Mac running macOS Mojave (10.14) or older, this is done through Apple’s iTunes app. Folks running macOS Catalina (10.15) or newer will use Finder instead, but the process is otherwise nearly identical; the only difference is really where the device options are located.
Step 1: Connect your iPad to your computer using an appropriate Lightning or USB-C cable.
Step 2: Open iTunes (Windows or macOS Mojave or earlier) or Finder (macOS Catalina or later).
Step 3: Select your iPad from the sidebar on the left.
Step 4: If prompted, click “Trust” to authorize your computer to connect to your iPad. You’ll also need to acknowledge this on your iPad and enter your device passcode.
Step 5: Under “Backups” select Back up all of the data on your iPhone to this Mac (Finder on macOS) or This computer (iTunes on Windows).
Step 6: Select Encrypt local backup to ensure that your backup contains your passwords and other sensitive personal data. For security and privacy reasons, iTunes or Finder will not back this information up to an unencrypted backup.
Step 7: When prompted, enter a password to protect your local backup and confirm it by entering it again. If you’re using a Mac, you can also choose to store this password in your keychain. Be sure to remember this password, as you will not be able to restore your backup without it.
Step 8: On your iPad, enter your device passcode when prompted. This additional step is needed to authorize the transfer of sensitive data on your device to the your computer to be stored in the encrypted backups.
Step 9: Select Back Up Now to begin backing up your iPad to your computer.
Joe Maring/Digital Trends / Digital Trends
How to factory reset your iPad
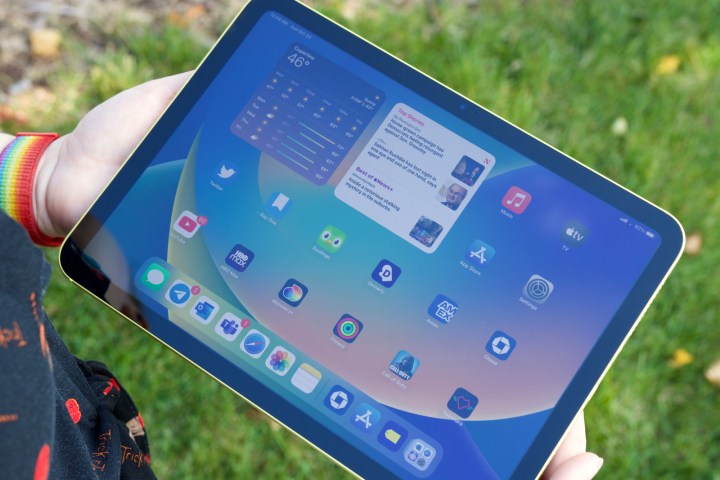
Performing a factory reset on your iPad can help you solve any issues that linger even after you’ve tried a soft restart or force restart. You should also factory reset your iPad before you sell it or give it away to someone else so they can’t access your data. A factory reset will completely wipe everything on your iPad. It will permanently delete all of your music, photos, messages, and everything else on your iPad, returning it to the way it was when you first took it out of the box.
Be sure to back up all of the files on your iPad before you start the factory reset, or they’ll be gone for good. You can back up using iTunes or iCloud, as described in the steps above, and we have a backup guide for the iPhone, which will work just fine for your iPad. Once you’ve backed up, you can follow these steps to factory reset your iPad:
Step 1: Open the Settings app on your iPad.
Step 2: Select General.
Step 3: Scroll down to the bottom and select Transfer or Reset iPad.
Step 4: Select Erase All Content and Settings at the bottom.
Step 5: Follow the prompts to confirm you want to erase all of the content on your iPad. You’ll be asked to enter your iPad passcode and your Apple ID password during this process to acknowledge that you want to erase your iPad and disable Apple’s Find My iPad and Activation Lock features.
Step 6: After the iPad has been restored, you’ll see an original setup screen similar to the one you saw when you first bought your iPad. During the set up process you’ll be asked whether you want to set it up as a new device or restore it using backup in iCloud or one you’re made to your Mac or PC.
Jesse Hollington / Digital Trends
How to factory reset iPad without password
If you’ve forgotten the password for your iPad, the only way you’ll be able to regain access is to do a factory reset. As discussed in the last section, this will erase everything on your iPad, returning it to a new, out-of-the-box state with no passcode set. Once it’s been factory reset, you can set a new password and restore it from a previous backup.
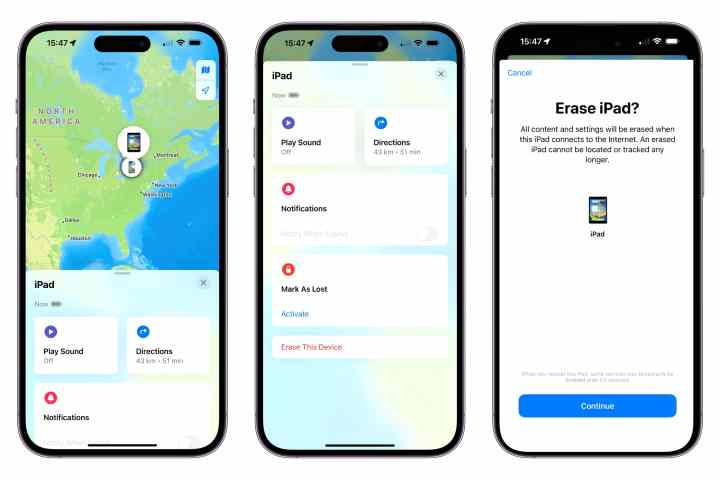
The easiest way to do a factory reset if you’ve forgotten your passcode is using Apple’s Find My service. This will only work if Find My is already enabled on your iPad, but unless you’ve taken specific steps to disable it, there’s a good chance that’s the case. Find My is typically switched on as soon as you sign in with your Apple ID when setting up your iPad for the first time.
Step 1: Open the Find My app on a Mac or iPhone, or visit iCloud.com using a web browser and sign in with your Apple ID and password.
Step 2: Select Devices.
Step 3: Locate your iPad in the list of devices and select it. A map view will appear to show the last known location of your iPad.
Step 4: If you’re using Find My on a Mac, select the “i” button to bring up the additional options menu.
Step 5: At the bottom, select Erase this Device.
Step 6: Follow the prompts to confirm that you want to erase your iPad.
Note that a remote erase done through Find My isn’t quite the same as a factory reset from the Settings app. For one thing, the Activation Lock won’t be disabled; the iPad will remain registered to your Apple ID until you manually remove it from your list of devices in Find My by selecting Remove from Account. You don’t need to worry about that if you’re factory-resetting your iPad to set it up for yourself again, but if you’re erasing it using Find My to sell it off or give it away to a friend or family member, you’ll need to take this additional step, or they won’t be able to activate it without entering your Apple ID password.
How do I reset my iPad for a new owner?
Looking to get rid of your iPad entirely? Then you’ll want to perform the factory reset option mentioned above. This will return your iPad to its default settings, removing all your personal information and files from the device. Be sure to back up your iPad using iCloud if you want to transfer your files to a new device. Beyond that, there’s nothing special about resetting your iPad for a new owner – just carry out a factory reset, and you’re ready to go.
FAQ about resetting an iPad
Does resetting or restoring an iPad delete my Apple ID?
Restarting an iPad does not erase any information on it, so when it finishes booting back up everything should be just as you left it, including your Apple ID.
Restoring your iPad back to factory settings will remove the Apple ID from your iPad since you’re effectively returning it to the same state it was in when you first bought it. However, it will not erase your Apple ID on Apple’s servers, nor will it remove any data that you have stored in iCloud. This data can be transferred back onto your iPad when you set it up again, either by restoring from an iCloud backup or syncing with iCloud to download your photos, calendars, contacts, messages, and more.
Since restoring your iPad to factory settings removes your Apple ID from the iPad, this will also disable features like Find My iPad and Activation Lock. That’s a good thing if you’re planning on selling your iPad or giving it away to someone else, but if you’re planning to set it up again for yourself, just make sure these features are re-enabled during the setup process.
Does restarting an iPad make it faster?
Just like a computer, rebooting an iPad can sometimes speed things up — or at least make it seem that way. However, that shouldn’t really be the norm; if you find that you frequently need to restart or reset your iPad to improve performance, there’s likely something else going on. Apple’s iPadOS does a very good job of managing apps, memory, and background processes, which means it shouldn’t normally let anything get away with slowing down your iPad behind the scenes.
Will a restart or factory reset help battery life?
As with improving performance, restarting your iPad or even resetting it to factory settings shouldn’t make a noticeable difference in battery life unless there’s a bigger problem under the hood. While bugs occasionally occur in iPadOS that impact battery life, Apple tries to make sure that doesn’t happen, and third-party apps are rarely allowed to continue running in the background where they can eat up your battery while you’re not looking. If you do find that your battery life regularly improves after a hard reset, chances are you’ve encountered a glitch that will be fixed in a future iPadOS update. You may also want to check out our roundup of common iPad problems and how to fix them to see if there’s another solution you may have overlooked.
Should I factory reset my iPad if it was stolen?
Erasing your iPad after it’s been stolen may seem like a good idea to ensure your personal data doesn’t fall into the wrong hands. However, it’s important to keep in mind that once you erase your iPad, you’ll no longer be able to track it using Apple’s Find My service. In other words, you’ll have to choose whether recovering your iPad or protecting your personal data is more important.
Of course, if you have a strong passcode — or better yet, an alphanumeric password — on your iPad, it’s unlikely a thief will be able to get at your personal data. Most thieves care more about your iPad hardware than your information, and while a random thief might try a few obvious passcodes, they’re unlikely to expend any real effort to break into a stolen iPad. They’ll likely try to wipe it anyway so they can try and sell it off for some quick cash.
If you think your iPad may have been lost rather than deliberately stolen, you can choose to put it into Lost Mode instead. This will ensure it’s locked down with your passcode — even if it was left unlocked — along with your Apple ID password. Lost Mode will also disable Apple Pay payment cards and related services and allow you to put a message on the lock screen in case it’s found by a good samaritan. This message will persist even if the iPad is erased.
Still, if you’re concerned about your personal data and don’t care as much about getting your iPad back, you should definitely log into Apple’s Find My service and do a remote wipe. Just remember that your iPad has to actually be online to receive the command from Apple’s servers; this could be a problem if your iPad only has Wi-Fi since it can only automatically join Wi-Fi networks that have already been saved. Nevertheless, once you’ve issued the remote wipe command, Apple’s servers will keep trying to send it to your iPad, so it will take effect if your iPad does eventually pop back onto the internet, even if that’s weeks later. Further, a remote wipe done through Find My won’t disable Activation Lock, so the person who has your iPad still won’t be able to get it up and running without knowing your Apple ID and password.
Editors’ Recommendations


