If you have one of the best Chromebooks and it works properly, chances are it is properly updated. Why? When Chromebooks get internet access they update automatically on a regular basis. However, if you’re facing common Chromebook problems, you’ll know that making a manual check to get your Chromebook updated is useful. Also, just because technology says it will do something, it doesn’t always mean it will. Here’s how to update your Chromebook in case it doesn’t do so automatically.
The steps to manually update your Chromebook are as follows:
- Open the “Settings” menu
- Access “Check for updates” in the About page
- Update and restart
The following sections will advise you through the finer points of each step if you need extra assistance.
Step 1) Open the “Settings” menu
In many cases, your Chromebook should update automatically when a new version of the operating system is available. But sometimes this doesn’t work, or you may want to make sure that a particular patch has gone through. In these cases, you can manually update. Here’s how to begin.
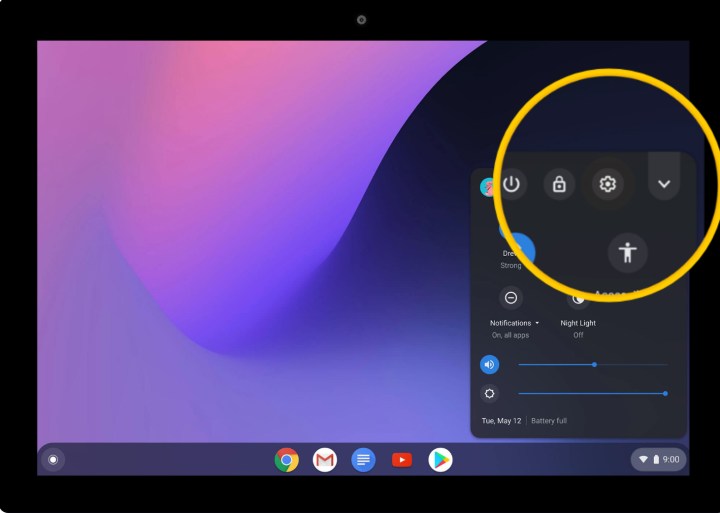
Step 1: Log on to your Chromebook, and make sure it is connected to the internet. Look down at the taskbar on Chrome OS, and at the right you should see the System Tray, where the clock is positioned. Select the clock to continue.

Image used with permission by copyright holder
Step 2: With the System Tray open, look at the icons at the top of the window and select the gear-shaped Settings icon.

Image used with permission by copyright holder
Step 2) Access “Check for updates” in the About page
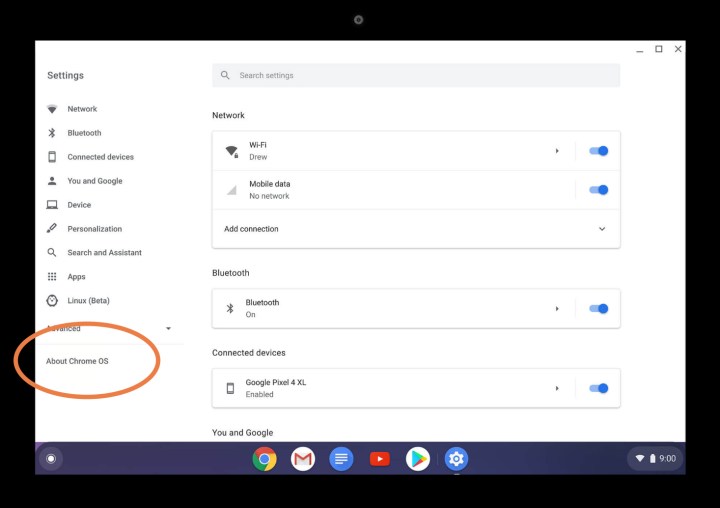
Step 1: Settings will open its primary menu with information on your network connections. To find out more information on your updates, look at the lower-left corner and select the final option on the left menu that says About Chrome OS.

Image used with permission by copyright holder
Step 2: Your Chromebook will now display info about your version of Chrome OS. On the right, select the button that says Check for Updates.

Image used with permission by copyright holder
Step 3) Update and restart
If your Chromebook detects an update, it should start updating automatically at this time. Here’s what you need to do.
Step 1: Wait for the update to finish downloading. Under Google Chrome OS, you will see the percentage of the update that’s complete. It’s important that your Chromebook doesn’t unexpectedly shut down at this time, so make sure it’s plugged into a power source if necessary.

Image used with permission by copyright holder
Step 2: After the download is complete, you will see a notification to Restart to complete the update. Double-check that you don’t have any work to save, and then select Restart. The process may take at least several minutes to complete, until Chrome OS launches again.
Step 3: If it was a substantial update, it’s a good idea to look at the Google Chrome OS section and select See What’s New below it. This will introduce you to any new features that a Chrome OS update may have recently added.
Troubleshooting failed updates
If something goes wrong, the system update won’t successfully download and you won’t be able to update. If this happens to you, there are a few things you can try to fix the problem.
Step 1: Again, make sure that your Chromebook is connected to its charger and isn’t in a low-power state.
Step 2: Turn your Chromebook entirely off, and turn it back on again before trying to start the update process.
Step 3: Check that your internet connection is strong. If you are in an area with spotty Wi-Fi, the update may not be able to download correctly.
Step 4: If you are using a cell data plan to connect your Chromebook to the internet, try switching to Wi-Fi or an Ethernet connection, and try again.
Looking for more Chromebook-related help? Check out our guides on how to reset a Chromebook and common Chromebook problems and how to fix them.
Editors’ Recommendations

