
Live Photos is a fun feature Apple brought to the iPhone 6s many years ago, turning static photos into three-second clips by capturing what happens in the 1.5-second interval before and after you tap the shutter button. This feature has been a staple of every iPhone model since then, and even if you’re new to the iPhone, you’ve likely already used it already since it’s turned on by default — you have to take specific steps to disable it if you want to go back to taking normal snapshots.
There aren’t any significant downsides to leaving Live Photos enabled. You can share them as a normal, static photo just like other image, and while they will take up a bit more space on your iPhone, that’s not as significant as it once was, thanks to Apple’s switch to the more efficient HEIC format in 2017. While Live Photos could once grow nearly twice as large as the same static JPEG, today you’ll more typically see only a 25% difference, on average.
However, while you can easily share a static version of the photo anywhere you can post or send a normal picture, the animated part is a bit more challenging. Naturally, Live Photos will work fine when you share them within the Apple ecosystem, so sending them via iMessage or a Shared Photo Album to a friend with an iPhone, iPad, or Mac is no problem at all. Apple has also made its Live Photos technology available to third-party websites, and social media services like Facebook, Instagram, and Twitter have gotten on board. Even Google Photos has supported Live Photos for years, and can even enhance them for you.
Still, if you want to share a Live Photo and be sure it plays properly for everyone looking at it, the best way is to convert it to a video or animated GIF. That’s also a good idea if you want to preserve your Live Photos in a more standard and future-proof format. While there’s no reason to believe Live Photos won’t continue to work on Apple devices for years, all bets are off if you want to see them on a Windows PC or Android phone or tablet.
The good news is that Apple makes it very easy to save a Live Photo as a standard video. In fact, it’s built right into the Photos app.
Julian Chokkattu/Digital Trends
How to save a Live Photo as video
The steps to create a video from a Live Photo differ slightly depending on which version of iOS you’re using. The latest version, iOS 16, works on any iPhone released in the last six years, whether that’s the latest iPhone 14 or iPhone 14 Pro or a 2017 iPhone 8. However, if you’re still toting an iPhone 6s or iPhone 7, both of which support Live Photos, you’ll be stuck on iOS 15.
Fortunately, the process is nearly identical for both versions, with only one option located in a slightly different place on those older models.
Step 1: Open the Photos app on your iPhone.
Step 2: Select the Album icon from the bottom.

Jesse Hollington / Digital Trends
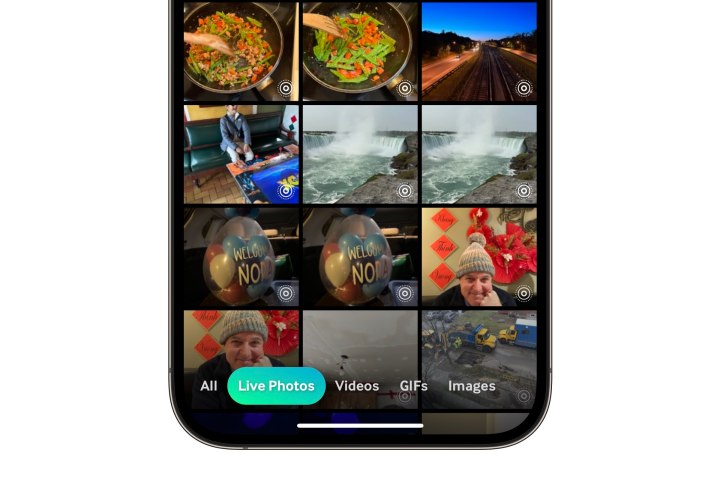
Step 3: Scroll down and select Live Photos from the list below “Media Types.” This will show you a gallery view of only the Live Photos stored in your photo library. You can navigate here as you would the main Library view, including using pinch gestures to zoom in and out on the grid.

Jesse Hollington / Digital Trends
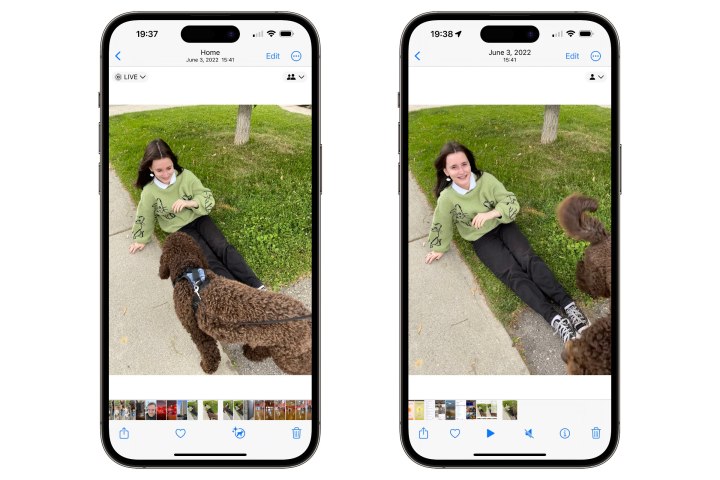
Step 4: Choose a Live Photo from the gallery to open it.
Step 5: With your chosen Live Photo open, tap the three-dot More button at the top right of the screen. A drop-down menu will appear with more options.
If you’re using iOS 15, you’ll need to choose the Share button instead to bring up the standard iOS share sheet.

Jesse Hollington / Digital Trends
Step 6: Choose the Save as Video option from the pop-up menu (iOS 16) or the share sheet (iOS 15). Your iPhone will create a copy of the Live Photo as a standard video clip.
Jesse Hollington / Digital Trends
Step 7: If the “Save as Video” option does not appear on the menu or share sheet when you have a Live Photo selected, this is most likely because you’ve either turned off the Live Photo feature or enabled an effect mode such as a Loop or Bounce (which we’ll discuss in the last section). Live Photos with effects cannot be converted to videos, so you’ll need to set the photo back to a normal Live Photo.
You can do this by selecting the Live button in the top left corner of the photo (which may also say Loop, Bounce, or Long Exposure) and setting it back to Live from the drop-down menu that appears.

Jesse Hollington / Digital Trends
Step 8: The video clip will be saved with the same metadata as the original live photo, including the same date, time, and location information. This means it will be sorted alongside the original Live Photo, which won’t necessarily be at the bottom of your Library timeline unless you’re converting one you just took.

Jesse Hollington / Digital Trends
Step 9: The fastest way to locate your saved video is to go back to the Albums view and look in the Recents album, which sorts your photos by the date they were actually added to your library rather than their internal timestamps.
How to combine multiple Live Photos into a single video clip
With iOS 16, you can also combine multiple Live Photos into a single video clip, effectively creating a montage of your Live Photos. Here’s how:
Step 1: Open the Photos app on your iPhone.
Step 2: Select the Album icon from the bottom.
Step 3: Scroll down and select Live Photos from the list below “Media Types” to see only the Live Photos stored in your photo library.
Step 4: Choose Select from the top right corner.

Jesse Hollington / Digital Trends
Step 5: Select the Live Photos that you would like to combine into a video.
Step 6: With your chosen Live Photo open, tap the three-dot More button at the bottom right of the screen to bring up the options menu.

Jesse Hollington / Digital Trends
Step 7: Choose Save as Video.
Depending on how many photos you’ve selected, this process may take anywhere from a few seconds to a couple of minutes. A “Saving…” dialog will appear while your Live Photos are being processed into a video. Once the video has been created, you’ll be returned to the Live Photos view; you may need to visit the Recents album, as described in the last section, to find your video, as it will have the timestamp of the oldest Live Photo you selected for your montage.
Note that there doesn’t appear to be a practical upper limit for how many Live Photos you can collate into a single video. However, as with converting an individual Live Photo to a video, you won’t be able to include Live Photos where you’ve disabled the Live Photo feature or added a Loop, Bounce, or Long Exposure effect to. The”Save as Video” option won’t show up on the menu if any of these are part of your selection.
How to use Loop, Bounce, or Long Exposure with Live Photos
You can also add special effects to your Live Photos to make them a bit more fun. Apple currently offers three: Loop, Bounce, and Long Exposure.
Loop will turn your Live Photo into a short loop that plays continuously without a pause, while Bounce makes the Live Photo play backward and forward continuously. As the name suggests, Long Exposure displays your Live Photo as a static image that combines the three seconds of video to make it look like a picture taken with a very slow shutter speed.
While Live Photos with these settings enabled can’t be converted to videos using the tools built into the Photos app, you’ll still be able to view them on your iPhone and other Apple devices and share them with friends and social media services that can handle Live Photos.
Step 1: Open the Photos app and choose a Live Photo.
Step 2: With the selected image open, choose the Live button in the top left corner, and select Loop, Bounce, or Long Exposure from the pull-down menu. You can also select Off if you’d like the Live Photo to appear as a normal static image.
How to convert Live Photos to animated GIFs
In some cases, you may prefer to share your Live Photo as a GIF instead of a video. This may be preferable on some social media services, especially those that autoplay GIFs or don’t support uploading video clips.
There’s no built-in method in iOS 16 to convert a Live Photo to an animated GIF, but as usual, the App Store has a wealth of options to fill that void. Not surprisingly, one of the most popular is Giphy, which can convert any Live Photo to an animated GIF — even those with Loop or Bounce effects added — while letting you trim it, customize it with your own effects and share it directly to social media. Giphy also lets you save Live Photos as video clips with the same editing features and the ability to handle Live Photos with Bounce and Loop effects.
The only downside to Giphy is that you’ll have to sign up for an account to use it, although it supports Sign in with Apple. However, if you’d prefer to avoid that step, there are several other apps on the App Store that will get the job done, although they aren’t as full-featured as what Giphy offers.
Step 1: Download Giphy from the App Store, open it, and sign in or sign up for an account.

Jesse Hollington / Digital Trends
Step 2: Select Create in the top right corner.
Step 3: When prompted, grant access to your Camera and then select the photo thumbnail in the bottom left corner to open your photo library, once again granting access when prompted.
Jesse Hollington / Digital Trends
Step 4: Select Live Photos from the bottom to see only your Live Photos.
Step 5: Choose a Live Photo you would like to convert to a GIF to open it.

Jesse Hollington / Digital Trends
Step 6: A set of editing tools will appear to let you customize your Live Photo before saving it as a GIF, including cropping and trimming, plus adding stickers and text effects. Use these to make any edits you’d like, and when finished, choose the Right Arrow in the bottom right corner to proceed to the next step.

Jesse Hollington / Digital Trends
Step 7: A preview of your finished GIF will appear on the next screen. Choose Share GIF to proceed to the next screen, or the smaller Tap to Copy GIF if you’d prefer to just grab a copy on your clipboard to paste into another app.

Jesse Hollington / Digital Trends
Step 8: On the “Share Video” screen, choose Save GIF to save a copy of the GIF to your photo library, or Save Video to save it as a traditional video clip. You can also use the other options here to share the GIF directly to Messages, Facebook Messenger, Snapchat, or Instagram.
Editors’ Recommendations